Thursday, September 27, 2012
How to fix HDD Bad Sector with HDD Low Level Format?
Here are the steps for using HDD Low Level Format Tool:
1. Download HDD Low Level Format http://hddguru.com/software/HDD-LLF-Low-Level-Format-Tool/.
2. Install and run the program HDD Low Level Format tools to finish
3. Using HDD Low Level Format Tool
4. Select the hard drive you want to format, and then click Continue ..
5. Click LOW-LEVEL FORMAT tab, click FORMAT THIS DEVICE
6. Wait for it to finish, and usually the process will take a while, depending on the hard drive is used, can be 30 minutes, 1 hour, even hours.
Note:
In addition to the hard drive (SATA, IDE or SCSI), HDD Low Level Format Tool could be to reformat flash, Flash Card, and the like.
may be useful
Wednesday, September 26, 2012
How to solve the Acer Aspire One is dead ?
This is due to:
Program BIOS is damaged or corrupted data in the BIOS occurs Acer Aspire One this. This is likely the result of a bug in the BIOS Acer Aspire One or the default from the factory.
How to fix it:
1. Prepare Flasdisk 2GB maximum, then the flash format with FAT partitions.
File Download BIOS Acer Aspire One: http://support.acer-euro.com/drivers/notebook/as_one_150.html
2. Extract the zip file, then extract the file again extracted earlier and copy 2 files in it are flashit.exe and ZG5IA32.FD to flash directly without the folder / directory.
3. Plug the flash drive in the USB port left netbook Acer Aspire One
Plug Carger your Acer Aspire One netbook.
4. Press the Esc key and then hold down the Fn key and then press the power button once.
5. After about 15-40 seconds, release the Fn + Esc. Then the power button will blinking
6. Press the power button again, it will flasddisk lights blinking, a sign that the BIOS in the flash file is being accessed (let some time because the process is running even if the power light does not turn invisible.)
7. Wait a moment, then the light will stop blinking power and then the netbook will restart by itself. After the restart, the Acer Aspire One will live again normally. Process Recovery Bios Acer Aspire One is not more than 15 minutes.
Good luck!
Thursday, September 13, 2012
How do I fix the flash is not detected?
The following is just a way for computers with the Windows OS
1. Insert the stick into the USB port of the computer. If detected appears in the usual hard drive or in My Computer after a while.
2. If it appears try to right click on the USB drive icon and then left click on format. Choose FAT32 for operating systems beyond Windows 98. Click start and then format.
or by way of:
1. Download an application called HDD Low Level Format Tool
http://www.techspot.com/downloads/5265-low-level-format-tool.html
2. Then install as usual
3. Open the application we will look at the screen all the disk drives detected
4. Select the flash to be repaired and then click "continue". Ensure that you have the correct drive not to any
5. Then select LOW-LEVEL-FORM and click Format this device
6. Well, now the flash is ready for use, before we have to format it first
May be useful
Wednesday, September 12, 2012
How do I fix Error 5B00 on Canon iP2770 ?
Previously you should have a resetter Canon iP2770.
If you do not have a try Download Resetter Canon iP2770 v1074 are widely spread on the internet
First into Service Mode iP2770:
1. The printer is turned off and the power cord.
2. Press the RESUME button two seconds
then press the POWER button until the green light flash (when pressing the POWER button, ... RESUME button jgn removed first)
3. Then release the Resume button, but do not release the button POWER.
4. While the POWER button is still depressed, press the Resume button 5 times. Led will flash alternately orange last green with orange flames. (not to be mistaken 4x because the printer will die in total, but it is temporary too) Then ...
5. Release both buttons simultaneously.
6. Led will blink for a while then it will flash GREEN.
7. The computer will detect the new device, ignore it .....
8. This situation shows iP2770 printer in a state of SERVICE MODE and ready to reset.
Then run Resetter iP2770 v1074 it:
1. File Exctract Resetter iP2770.
2. Prepare 2 paper in the printer (to print at the time of the reset process).
3. Run the program Resetter iP2770
4. Click "PLAY", then the printer will proceed, then the iP2770 will print a page with the words "D = 000.0"
5. Click "EEPROM Clear".
6. Then click "EEPROM", and the printer will print the results Resetter iP2770. One line in his writings as follows:
"TPage (TTL = 00000)"
7. Turn off the printer by pressing the POWER button.
8. Done ...
May be useful
How to fix the Canon Printer Cartridges?
Steps to fix it, namely:
1. If the printer has not been used, and then want to repair, it would be nice printer cartridges soaked in warm water (to facilitate ink frozen). Warm water should soak the bottom and the side of the cartridge.
2. Soak for - / + 20 minutes, then drain until dry (can wipe gently with a soft cloth).
3. Please fill cartridges with a special type of printer ink canon printer (if empty ink).
4. Cartridges pair back to your Canon printer.
5. please turn on your printer, be sure the driver is installed first.
How to reset Epson Printer T10, T11 ?
An easy way to reset Epson T10 and Epson T11 with easy to use software and you can download the tool.
Immediately, we reset software epson T11 is guaranteed to be 100% OK and that certainly goes free.
1. Previous Driver Printer Epson T11 must be installed on your computer .. To Download drivers look at the following page www.epson.co.id/epson/drivers/driver_download.htm?mode=2&catid=&productModel=1
2. You must have the "Software Resetter Printer Epson Stylus T11" to download software resetter Epson T11 printer
http://www.ziddu.com/download/7560800/ReseterT11Working-16-Nov-2009.rar.html
3. Date computer does not need to be changed as previously resetter.
4. The next step run the program resetter Epson T11 with double click on "Loader.exe", do not jump on the "AdjProg.exe" because the program will not run if straight out of "AdjProg.exe"
5. Then the next step to follow, Accept, Select, Select Model T10/T11, click OK, particular adjustment mode, ok, Finish.
May be useful
How to fix a clogged print head, Loss?
1. Problems jammed or clogged print head ink is often caused by improper usage, whether it is the Canon printer, Epson printers and HP printers can all be having problems Print Head.
2. Print Head can be jammed between other blockage caused a small hole on the print head because the ink dries so the ink will not get through. As a result of clogged print head then we will not be able to print or even result in the maximum can not print at all.
3. First, prepare a spot size of approximately 250 ml and make sure clean from dust or other sisakotoran
4. Furthermore, the content of the site with 1 tablespoon alkoholl, one drop of liquid dish soap, and then you stir until completely uniform. Now that our cleaning solution used to clean the print head.
5. Dip a little cotton to the cleaning solution, then put the print head jam that we will improve. This cleaning solution will break up blockages in the print head is jammed and clogged.
6. The final step is the print head with a cotton cloth or a clean dry cloth.
7. Then the print head is ready to try again printing process.
Perform steps 3-7 over and over until the print head really is not clogged anymore and can print fine and normal again, if it had done several times apparently fixed print head can not score well then you are sure the print head is damaged permanently and should be replaced with new ones.
may be useful
How to fix it yourself home button is broken?
I suggest to take it to an Apple Authorized Service to be repaired.
If you are at all the Home button does not work, try turning Assistive Touch to still get the Home button functionality on the iOS screen. Many iOS users turn on the feature to minimize damage to the Home button.
Go to Settings> General> Accessibility> AssistiveTouch and turn on the feature.
Once turned on, you will see a transparent button on the screen that can mimic the functions of the Home and other gesture.
How to calibrate your iPhone Home button
1.Run any application, then hold down the Lock / Power to exit the Slide To Power Off. Not on Slide, even death.
2. Remove the Lock / Power.
3. Now, press the Home button slowly, lest nekannya pol. Hold to return to the Home Screen. Although pegel, do not be removed.
4. Well, now try again press the Home button. More soft right?
Perform the above steps if the home button was starting to feel hard, or just the next. If the above steps are the try but the home button was hard or just working part, that has been badly damaged. Should be brought to an Apple Authorize Service.
How to add hundreds of thousands of Twitter Follower Free?
following sites that you can visit:
twitclub.com
twiends.com
newfollow.info
followback.info
hitfollow.info
youlikehits.com
letgetmorefollowers.info
plusfollower.info
please try ..
How do I create a Marquee or writing work?
the following script:
1. right to left
" <marquee direction="left" scrollamount="2" align="center"> Posts Walk </ marquee> "
<marquee direction="left" scrollamount="2" align="center"> Posts Walk </ marquee>
2. left to right
" <marquee direction="right" scrollamount="2" align="center"> Posts Walk </ marquee> "
<marquee direction="right" scrollamount="2" align="center"> Posts Walk </ marquee>
3. back and forth
"<marquee direction="left" scrollamount="2" align="center" behavior="alternate"> Posts Walk </ marquee>"
<marquee direction="left" scrollamount="2" align="center" behavior="alternate"> Posts Walk </ marquee>
4. top to bottom
" <marquee direction="down" scrollamount="2" align="center"> Posts Walk </ marquee> "
<marquee direction="down" scrollamount="2" align="center"> Posts Walk </ marquee>
easy not ...
how to make a bootable USB Windows 7 and other Windows versions.
Free software that we will use to create a bootable USB this time it was Rufus.
1. Rufus is very light and most rapidly than software like. The file size was very small, only about 400 KB only.
2. Easy to use to create a bootable USB from a bootable ISO file (Windows, Linux, etc.)
3. It has a variety of other functions such as low-level utility, flash the BIOS or other firmware.
4. Download Rufus
Download Rufus 1.1.3
5. Make sure the USB drive has been installed on your computer, then run rufus_v1.1.3f.exe
6. Make sure you check the "Create a Bootable Disk Using". If you want to create a bootable USB Windows 7 or any other version, use the "ISO Images" as the source. Then click the browse button that is next to it.
7.Pilih ISO file you want and click "Open".
8.Klik start to begin to create a bootable flash.
it's easy right ...
Saturday, September 8, 2012
How to make your Windows 7 to Original
here's how:
1. Download Windows 7 Loader Software
2. Run the software, the next checklist "advanced options", then please select the desired brand in the third column on the right side, if you've finished, click "install certificate and serial". Click the next dialog box "install" in the bottom left.
may be useful ...
How to display the files lost by virus shortcut
you can do it in 2 ways:
1. use the command window, click start run, then type the command cmd (command prompt), then type the following command: attrib-s-h-r or attrib /? and use the command according to your wishes
2. use the windows explorer, tools - option - then click on view hide the file, you will see the missing file.
commands is used before the hard drive or flash disk format.
hopefully useful.
Recovery Manager on HP laptop
1. Turn on the laptop and press the F8 key when HP (or any other brand) logo appears on the screen.
2. On the next screen you should see Advanced Boot Options. If for some reason you don’t get this screen, restart the laptop and press on the F8 key again. From all available options select the very first line: Repair Your Computer and press on the Enter key.
3. This should take you to the System Recovery Options.Select available language and keyboard layout. Press on the next button.
4. On the next screen select your user name (must be user with administrative rights) from the drop down menu. Enter the user password and press the OK button.
5. This will take you to the next System Recovery Options window. The last option will be HP Recovery Manager. Click on it.
6. This will take you to the next window: HP Recovery Manager. There are many different options here and one of them – System
Recovery (Restore your computer to its original factory conditions).
Select this option and follow the instructions on the screen.
may be useful ....
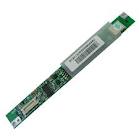
How to fix LCD inverter
Do not always replace the LCD inverter LCD inverter when it is broken. There's something that can be tried first before replacing it. When the laptop LCD inverter stopped working because of the cold solder joints. All you have to do is reflow solder joints. Roughly it takes 5 minutes to do. If it is not new you can replace it with a new one. Hopefully useful .......
Subscribe to:
Posts (Atom)
